ChurchSuite Plan Viewer
A simple tool to view and print service plans in ChurchSuite
View the Project on GitHub hussra/churchsuite-plan-viewer
Template editor
The template editor within ChurchSuite Plan Viewer will let you customise the provided templates, and create your own. It is opened by clicking the pencil button next to the Select a template drop-down in the main window.
If you are lucky enough to have dual monitors on your computer, you may find it convenient to put one window on each monitor!
Overview
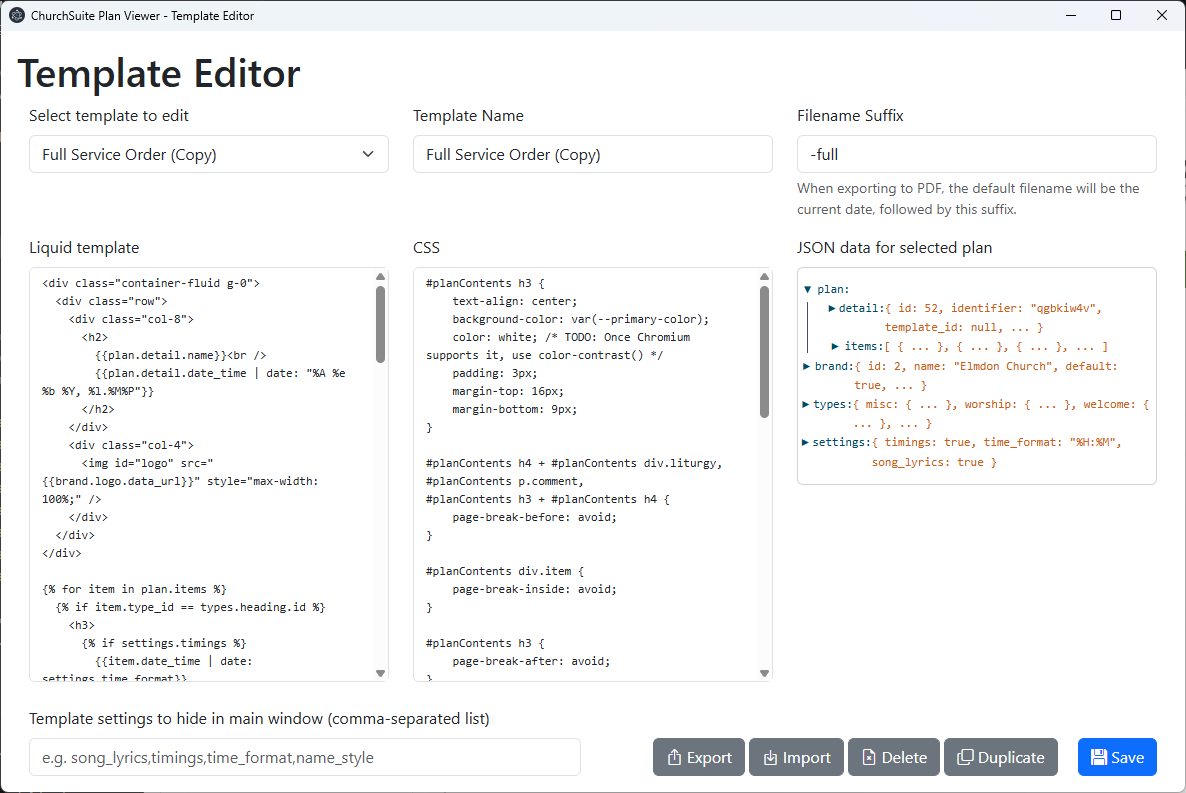
The template editor window is divided into three sections:
- At the top, you select a template to edit, and edit its name and settings. The Filename suffix is used
when the program suggests a name for the exported PDF file - for example, the “Full Service Order” template
uses a suffix of “-full”, so suggesting filenames like
02-11-2025-1100-full.pdf. - In the middle, you control how the template displays your service plan - see below.
- Bottom left is a field which allows you to hide certain template settings which do not make sense with a particular template.
- And at the bottom right are controls to save the current template and to duplicate, export, import and delete templates.
The default templates are not editable. So, to get started, pick a template you want to start customising, and click Duplicate.
Liquid template, CSS and JSON data
The middle portion of the template editor window shows three things:
- The template, written in the Liquid template language, which processes your plan’s data to create an HTML web page.
- A CSS stylesheet which is applied to the template.
- JSON data representing the selected plan.
Only the first two of these are editable within the template editor. It is the combination of all three that creates the printable plan.
JSON data
Use the right hand section to explore the data available to your template, clicking the triangle icons to expand and collapse different sections. Most of this data is structured according to ChurchSuite’s Planning module API models.
There are three top-level objects:
plan, representing the chosen service plan. Within this are two further objects:plan.detailcontains the overall plan properties. It is a Plan model with one addition, thedate_timeproperty which represents the plan’s start date and time as a JavaScript Date object.plan.itemsis an array of objects, each representing an item in the service plan as a PlanItem model with one addition, thedate_timeproperty which represents the plan item’s start date and time as a JavaScript Date object.- If Show song lyrics is selected, and a service item represents a song, the item will additionally have an
arrangementproperty which is a SongArrangement model, and asongproperty which is a Song model. Thearrangementproperty is in turn augmented with astanzasproperty which is an array of objects, each representing a stanza of the song chart. Each stanza has anameproperty (e.g.Verse 1, and an array of strings representing the lines of that stanza.)
brandrepresents your account’s default branding as a Brand model, allowing you to display your logo and use the default brand colour. In addition, alogo.data_urlproperty is added giving your logo as a data: URL for easier display within your template.typescontains a set of properties each representing one of your plan item types as Type model, and with the key being the type name converted to lower case with spaces changed to underscores. This can be used by your template to display the different item types in appropriate ways - there are examples of this in the default templates.
The #planContents pane
When your Liquid template has been applied to the plan data, it is loaded into the right hand pane of the
main plan viewer window, where it is inserted into a <div id="planContents" /> element.
This pane has the Bootstrap 5.3 styles applied,
including their sans-serif native font stack. Your template’s own styles are also loaded, and in them you can use
the --primary-color variable to reference your ChurchSuite account’s primary colour.
Liquid filters
In addition to the standard LiquidJS tags and filters, the following additional filters can be used
bibleBook, which converts the abbreviations ChurchSuite uses into a more recognisable name of a book of the Bible.markdown, which converts Markdown text (using the CommonMark specification) to HTMLpersonName, which takes a person and formats their name according to the user’s chosen Default name style setting.songKey, which takes a song item and displays the song’s key.songCredits, which takes a song item and displays its copyright information, including your CCLI Licence number if configured in the global settings.
Examples of using all of these can be found in the default templates.
Importing and exporting templates
The Export and Import buttons do exactly what you expect, saving templates as a .plantemplate file that you
can share with others.